Welcome....

"...at its core....art is simply the language of the soul" -Robert Redford

Thanks for stopping by. Please enjoy your stay here. Have some Sweet Tea, grab a chair and sit a spell. Rekindle your SOUL, Embrace the ART and Believe your DREAMS. Stay as long as you like and come back soon. Friends are always welcome here.

Monday, January 18

LOVE altered book for the Lottery

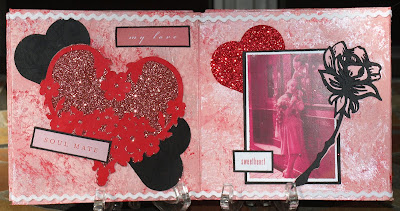
As I posted last week, I had 2 LOVE Lottery pieces to finish. This is the 2nd!! It is an altered, LOVE 6 panel accordion style brown paper book. You can buy them from Oriental Trading. Each album has six 5" x 5" panels.

I mixed up a custom paint made from Red Metallic Folk ART and Wicker White paint for the base coat, both sides and let it dry.

I took 3 sea sponges, added in some red metallic, silver metallic, and lighter pink and sponged painted a top coat onto the book and again, let dry.
Close-up of the painting:
To embellish the book I cut LOVE phrases from this sheet of scrapbook paper from DCWV, Valentines Words and then layered them and ran them through the Xyron Sticker Maker.


All other images were cut with my WONDERFUL new Cricut Cartridge, "Love Struck." I knew I would like this, but it is WAY better than I imagined!! :) I LOVE everything it can cut!!


Some of the hearts were stamped with a Versamark pad, some were glittered. I used 2 colors of vintage ric-rac. The images were from a friend.
Hope you enjoy the journey through my book of LOVE.


Front Cover


Back Cover


Pages 1 & 2 (click to enlarge)


Pages 3 & 4 (click to enlarge)


Pages 5 & 6 (click to enlarge)


The whole open book.

Tuesday, January 12

Wooden Valentine Puzzle Cubes in a Box

One of the monthly lotteries I am in has the theme (chosen by me) of LOVE. What can I say?? I simply ADORE Valentine's Day!! So, since I picked the theme I figured I should make something cool. I have always wanted to make a Puzzle Cube set. I had these little wooden cubes so off I went on my adventure.

For this project you will need:

wooden cubes (I used nine 1" cubes)
1 box to fit your cubes (I used a repurposed coaster box)
printed paper for your puzzles images (I chose to do 4 of the 6 sides)

Basic supplies:

Paint/Brush
Gel Medium
Black Sharpie Marker
Double sided adhesive
Exacto knife
Paper cutter
Ribbon/Lace to tie up your package
Stamps
Versamark ink pad
Rubberband


I painted my cubes metallic black. Cut your puzzle images to size (to fit one entire side of the puzzle). Hold the blocks together with a rubber band. Glue down one puzzle image with gel medium. When dry, cut the image apart on the blocks' lines. Cover with a top coat of gel medium - let dry.

Turn the blocks to another blank side, secure with the rubber band and repeat the steps for each of the 3 remaining sides. When completely dry and trimmed, hit the edges with a black sharpie marker.


I covered the bottom of the box with black paper. I stamped the edges and the bottom with a Versamark Ink Pad and a handful of Valentine Stamps.

I left the lid uncovered as I liked the color and border. I added a framed piece of the puzzle's images to the top. I tied it up with some ribbon and a piece of lace!!

Monday, January 11

An Angel of a Giveaway....

Hey friends,
You need to check out KCWillis. She is offering an amazing giveaway and some awesome online classes. Here's a bit of her post, copied with permission.
"Here she is...ain't she awesome? A fabric collage on an old book cover. Handmade by moi just for you. On the back I have handwritten the words..."Post an angel at your door. Fear the darkness nevermore." I know...I know...the gift-giving season is over...but the spirit is still upon me. I am giving away one of these angel book collages to EVERYONE who mentions and links just one more time all the cool stuff that is going on at KC Willis' studio. Your blog, Yahoo group, Ning group or Twitter will work. Facebook status updates don't count as they don't stay around long at all...but if you're part of a FB art group and can post it there that will count."
Isn't this an amazing lady?? Here are links to her online courses to check out!! :)

Friday, January 8

Button Fairies

Okay, these are seriously cool. I've just discovered button fairies. We are having a swap on one of my groups that I am hosting. They are totally fun and quick to make (that is unless you are VERY anal about picking out things like me.....then the button selection can be a monumental task). DH loses it with me in the frozen food section because if I am picking out a frozen meal.....well, let's just say it takes awhile. LOL

You can find some great tutorials here, here and here. These are my first two attempts. I am sure more will be forthcoming.

I had this graphic that was screaming "make me a button fairy please." I think the feathers were the perfect addition. Miss Pookie (#1 kitty) REALLY thought the feathers made the fairy into a yummy morsel for a between meal snack. The fairy is now safely stowed Away from inquiring paws.

This is my 2nd fairy.....of course I HAD to use Mona.....and she would feel so under-dressed without her crown. Anywho.....that's what I have been making. What are you waiting for?? Go grab some buttons, some wire and an image or two and get cracking. :)

Thursday, January 7

Valentine Heart Hangie Danglie

LOVE is in the air.....every sight and every sound......
Valentine's Day is MY fave holiday. You will be seeing a whole LOT of LOVE around my blog for the next month!! :) Here is today's offering.
I signed up for a Valentine Hangie Danglie mingle awhile back. I didn't take step-by-step photos but I think you'll get the idea!! I used Andrew's Cheerios box for the hearts so it is a repurpose project as well.

I cut 2 hearts using a stencil. I cut out the patterned paper about an inch or so wider all around the heart shape. I just eyeballed it and cut it with scissors and glued each one down. I cut tiny "notches" from the outside edge of the Patterned paper to the edge of the cardboard heart. I ran a line of adhesive around the outer edge of the cardboard hearts and folded each little "tab" to the back. I added another line of adhesive around the edges and center of one heart and placed the sparkly lace trim, then glued the two hearts together.


The heart has tiny spots of Martha Stewart Pink Tourmaline glitter and highlights of my fave Sakuara Stardust gel pen on both sides. I punched a hole for the Danglie and glued the black ribbon hanger to the back.

The danglie is made from 8 scrapbook punch out letters, glittered, glued back to back, punched and connected with jump rings. They are attached to the heart with a beaded wire circle and finished off with a hanging red faceted crystal bead. This is headed to my friend Wanda so I hope she enjoys it!! :)

Tuesday, January 5

Masterboard Technique and Results

Over at one of my Yahoo groups, we are having new techniques on Fridays. The first one was called Masterboard. Basically you take a piece of cardstock and some stamps and literally fill the page. You random stamp your images beginning with the largest and continuing on down the line until it is filled. Then, using dtp (direct to paper) color in your page with random splotches of color. The key here for both of these steps is DON'T THINK.....JUST DO. You want it be unplanned. Then you cut up (or tear up) pieces of these sheets and make new ART projects with them Our challenge was to make 6 cards. I stated with one 12 x 12 sheet of pink cardstock since I wanted to do a Valentine theme. I managed to make 6 cards, 1 book mark, 1 ATC and 1 Tag with my sheets.

The supplies I used for the masterboard were: Jet Black Stazon Ink, Pink Cardstock, a handful of Valentine Rubber Stamps and some coordinating cat's eyes chalk ink pads.

To finish off the ART projects I used: White Glue, Martha Stewart Black Onyx Glitter, Black Cardsotck, Glossy White Cardstock, Tape Runner Adhesive, Xyron Sticker Maker, Paper Punches: 1" & 1 1/8" Squares and Round Hole Punch, and bits of Vintage Black Lace.

Here is the stamped Masterboard after stamping.


Here is the stamped Masterboard after coloring.


The finished ART pieces.


My fave card......you can barely see the Versamark Stamping on the Black Cardstock in this view. If you click the pics to see them larger it is visible on them all!! :)

Card #2


Cards 3 & 4....simple yet effective


Card 5 & 6


The Tag, ATC & Bookmark


Valentine Masterboard #2 step #1

Valentine Masterboard #2 step #2


Blue Moom Masterboard step #1

Blue Moon Masterboard step #2

Here are a few links to some more Masterboard Inspiration: here, here and here.
It's amazing to me how I like them when they have just been stamped until they are colored. What a difference it makes. So, will you try this technique in your ART studio? Please leave me a link if you do!! :::smiles:::